Monday, December 31, 2012

Christmas!

Once upon a time...  
There was a place called "Christmas."

Cody and I decided to go there. 
We found ourselves a Snow Beast, (on loan),

Strapped on some snowshoes, and headed out to find Christmas.  

 
We found it!  And some friends.  

We played hockey on a frozen pond- and even though it was very cold, we stayed toasty warm.  
Cody and I even won the hockey game.  

We were rewarded with gifts and buffalo steak. 
The End.
Thank you Gramma Jane for the most amazing sweater! 


MADNESS

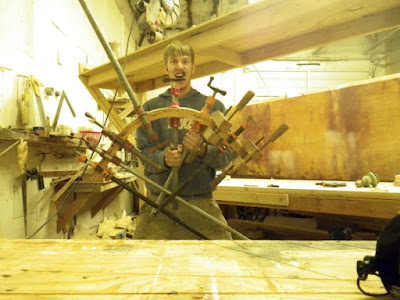
Using lots of clamps and as much pressure as I could physically manage, I glued the knee together!


The end grain of my knee, 12 1/8" laminations.

Here it is holding up the table, the knee is more than strong enough, but the table flexes a little.

Beth wanted a table that opened up so she can store trinkets and other stuff.  This requirement ended up working great, it gave the table enough strength to cantilever the whole way and not sag.  I recessed the hinges and then veneered over them, so you can't really see them at all.

The companion way ladder, the sides are VG fir and the treads are some of the salvaged Teak from the Tartan we ransacked.


Beth gluing in the vent line for one of the water tanks.

Monday, December 17, 2012

Back to/from work?


I have been busy working on a climbing wall in Park City lately and have had to put the boat aside.  However the wall turned out pretty cool.  The wall is in a condo that sits on a little pond,  I'm guessing the condo is about 700 sq. ft. and the climbing wall is 170 sq ft.   Pretty committing, but I think that means he will actually put the wall to use.


 This wall was a little different than most I build  in that it is wood framed.  Wood sounds much easier to work with but I find it more difficult for climbing walls.  The problem is all the connection points, steel is just like gluing everything together, the possibilities are endless.  Wood on the other hand has two issues of wood grain and splitting.  Wood makes a lot of sense when things are square, but climbing walls are not sqare.

I did almost break a 2X6 in a way I never have before.  In order to get the sheeting to lay flat to the framing the studs have to be twisted the match the twist of the wall.  Usually I'm twisting angle iron (L shape) which is easy, but a fir 2x6 doesn't like to be twisted.  Anyway I stopped twisting it after I heard a pretty good crack, and it didn't break in half.


Check out this contraption .  I was trying to bend some mahogany trim into place and the piece broke in half, so Beth and I rigged up this steam box.  We used a camp stove and a pressure cooker for the steam.  Then I found some scrap copper pipe and a length of PVC pipe.  The trim piece goes in the tube, and we just used some old rags to block off the ends.  Turns out pressure cookers are less frightening when steaming wood than when steaming vegetables.

We steamed it for about 25 minutes and it bent into position no problem.  I forgot to take a picture, but I think the steamer was cooler than the finished product.


While I was working on the wall Beth glued together our sewage holding tank.  Which serves as part of the floor under the dinette.  Again no photo, next post.

I thought this ended up looking pretty cool.  Its the a leveling pad to mount the toilet to the hull.


I just started this madness today, 1/8 inch strips of wood  bent to a pretty tight radius, which will make really cool looking braces to hold up the table.  I'm going to try and make the table without any center or end support, so it will just be sticking out of the side of the boat.  If its possible it will look awesome, but I have my doubts as to whether it will be strong enough.

Back to work, but I guess it just depends on your definition of work.

Thursday, December 6, 2012

We're puttin' tops on stuff!


This week on the boat, the icebox continues.....

We poured the outside insulation last week, and this week we are working on the lid.  The idea was to pour foam into the area where the lid would go, then pull the hardened foam block out and fiberglass the outside.  This should yield a lightweight and snug fitting lid.

I put a piece of plywood covered in plastic about three inches into the box to pour the foam onto.  Of course you can see the foam grew well out of its mold, which is good.  I cut around the edges and then Beth helped me pull it out using those three chisels.


There were a few voids, but it turned out pretty good overall.  


We rarely work on just one thing at the shop and this week has been no different.  I put some time into getting the port side deck framing in.  Beth and I glued the carlins(beam running from bow to stern) a month or more ago, so all I had to do was cut some notches and glue it in.  The trick with the carlin is getting it to run at at the same angle as the side of the boat.  It was sawn to shape, but as with most things needed to be tweaked a little.  I this photo we have laid pieces of wood across and then we just look down them to see if everything is flowing smoothly.  Then we used a clamp to raise and lower the carlin until it looked good.   

  
Here is the finished product.  We decided to go with pretty wide side decks, 18".  Our previous boat had much narrower side decks and it can be a pain to go back and forth carrying sails.  Of course on the flip side we lose some interior room.


Notch in the carlin where a side deck beam will go.


Beth, as you can see in this picture, has been on a sanding/painting tear.  Most of the interior has at least one coat of paint and some are finished.  It all looks so great with paint.


I caught Beth bashing the lid to her paint can on with the roller handle.


Freshly painted walls and Icebox.  We had just enough copper to finish the icebox top, It looks so sick!

I have been working for the man lately, so haven't been at the shop as much as I would like, but when I get this monkey off my back I'm going to start working on the Head(bathroom)(nautical terms suck).  Our toilet just arrived yesterday and now I have to find a way to fit it in the small space designated for it.  We'll see.